Warning to parents: If your child becomes interested in working with wood, this may result in a variety of physical, social, and mental health consequences.

Your child will develop hand-to-eye co-ordination, learn manual skills, grow in self confidence, find expression for their natural creativity, develop problem solving skills, develop a greater appreciation for trees, reduce their dependence on electronic entertainment, build muscle strength, increase dexterity with their hands, become handy around the house in future years, and may even develop a lifelong passion for woodworking.


If this scares you, please leave this site now!!

Click here to view my other blog: The Joy of Wood.

Saturday, February 2, 2013

Cajon drums. Fun to make and fun to play.

Last year I ran several workshops where kids and their parents/grandparents made Cajon Drums together. Such a lot of fun. The idea of the pairs each making a drum was so that they could jam together when they got home afterwards.

The Cajon Drum post on my other blog has generated a fair bit of traffic, so here is more info and a few suggestions about how to make these wonderful instruments. It is a great project for kids to make and play... like it is for adults too.

The material I use is mostly 12mm (1/2") plywood, except for the drum face which is much thinner plywood. Because I am a committed wood recycler, most of this ply I use is wood rescued from the waste stream, obtained from packing crates and packaging, construction sites, and anywhere else I can source it.

My favourite sound hole style in the side. Drum face painted with actual mulberries.
A suggested plan.
Cajon Drums come in many shapes and sizes, and range from simple versions to very complex ones. I tend to do two versions. These are basically the same dimensions except for the height. I do the adult versions 100mm (4mm) taller than the kids version.


The plan above shows the two sizes I commonly use, with the adult drum sides being 500mm long and the kids drum sides being 400mm long (tall). The top and bottom is the same size on both models of the drum. This makes component preparation and management much easier.

Construction.
The drums are assembled such that the sides and back sit between the top and bottom. This makes sense structurally as the drum is sat on in order to be played. The back of the drum is cut to fit within the sides, so it is captured between the sides and ends around it.

These butt joints are perfectly adequate as they are glued and nailed. Solid as a rock. I have kids aged 6 and upwards as well as adults making these drums in this way, and the simple construction is ideal.

The Sound Hole.
The sound hole is cut in one side usually before the drum face is fixed on. The sound hole can be cut in the side prior to assembly of the box, or it can be done when the box is all assembled bar the drum face. I usually get kids to do the latter, as it makes holding the box easy, as can be seen in the picture below.
After all is glued and nailed together except the face, the sound hole is then cut out.

 The sound holes I do with my workshop participants are based around the use of a brace and bit and saws.
The simplest method is what I call "Random Holes", where a bunch of randomly placed holes of various diameters are bored in one side using a brace and bit - looks a bit like Swiss Cheese.

The "Dog Bone" is the next easiest, created by boring two holes and using saws to cut out a slot between the holes. A bit like a vertical letterbox slot with enlarged ends. Sometimes people choose to do two of these features, parallel to each other.
My favourite is effectively two crossed Dog Bones, which makes a very nice cross shape. You can see there's one pictured (near the top of this post) on the Mulberry Drum.

A sound hole is essential, but the shape possibilities are infinite. It's fun to design and make your own, so long as it complies with a couple of basic rules. I usually suggest the cut-outs are never less than 50mm (2") from any of the 4 edges on the sound hole's side.  I reckon you don't want the sound hole to be more than 20% of the total area of the side in which it is situated. Other than that, the sky's the limit. I find the brace and bit and saws work really well for kids.


Almost there now... gluing and nailing on the drum face
Attaching the drum face.
The drum face is made from thin ply, anywhere between 3mm and 6mm (1/8" - 1/4"). Fixing on the face is the last part of the main construction process. I usually use wallboard nails, 16-19mm long (5/8 - 3/4"), with a good spread of glue on the surfaces on which the face is to be fixed.

It may be possible to just use a good glue, and no nails - so long as there is a good spread of glue and the face is cramped on while the glue is drying. However, I use nails to do the cramping, because when I run workshops making these drums, we sit on them and play them together as soon as we have finished. That's the whole idea! The glue and nail method enables this. The glue I used helps - Titebond III. It is a very quick drying and strong woodworking glue.


The fun of playing the drums together as soon as we've finished making them.
Ah, yes... playing the drums together at the close of a workshop. Just a little taster for the participants before they each go their separate ways with their new drum under their arm and a spring in their step.
 
Personalising the drums.
Workshop participants take home their drums in a raw state. Here is a golden opportunity to decorate the drums! People do a wonderful variety of designs on their drums. 


Decorating the drums is lots of fun when they are done. A sealer then goes over the top.

The Mulberry Drum pictured at the start of this post I did after the workshop where I had made it as a demo. There was a big mulberry tree covered in fruit which I'd been helping myself to, and I used the actual fruit to draw on the drum. I then brushed a coat of shellac over the top to seal it. Sweet.
This drum was painted by my grand kids. Zoe (aged 11) in full flight.
 I hope this additional information has been useful for you if you're considering making your own Cajon drum. ... Happy sawing, hammering, drilling and drumming!!

Monday, December 17, 2012

Planter boxes - a great project for kids.

I confess. As a committed wood recycler, I can always see lots of potential in discarded wooden packing crates, pallets, other timber needing to be rescued from the waste stream.Consequently I will often stop to pick up some treasures from the side of the road or the verge in front of an industrial unit.

Not far from where I live, there is a big glazing business. They import glass from several countries, and the crates the sheets come in get stacked up alongside the building until the pile gets too big. When it gets big, the pile is gathered up and it is all taken off  to landfill. A crazy waste. I have permission to raid the pile as much as I want. The best stuff in the pile is the glazing boxes.
That's a glazing box, about 2.5m long, with foam rubber padding and steel strapping.
This stuff makes great projects - or you can pull them apart to get the timber from them, which is what I tend to do with them most of the time. However, there is one project to which they are ideally suited - making garden planter boxes.
A lousy picture, but the IPSM 15 Mark tells us the pine packaging was debarked and heat treated in Indonesia.
How to make the planter boxes from the glazing boxes.

1. The tools and things you'll need:
  • Tin snips, to remove any metal strapping.
  • 50mm (2") galvanised nails, for connecting new ends and feet.
  • Hammer, for driving the nails.
  • Pencil, for marking where to apply the saw cuts.
  • Hand saw, for cutting the glazing box into sections.
  • some builders plastic, to line the inside of the planter box.
  • a brace and bit or hand drill, to drill some drainage holes in the base of the planter box.
  • a few scraps of pine, to make any new ends and the feet.

2. Start out by dividing the long glazing box into sections (planter box lengths) and mark where to cut the box. I commonly cut these 2.5m boxes into 3 sections. The two ends will just need one end added each, the centre section will need two ends added. Use a hand saw to make the cuts right through the glazing box.
Use a panel saw to cut the glazing box into the planter box sections.
3. Cut some pieces from scrap to make the new ends as needed. Use the nails to fix the ends in place.
 
Nailing on an end.
4. From the scrap, cut some feet and nail these in place, to lift the box off the ground. This will aid drainage and help stop the base from rotting.
Nailing the feet onto the base of the planter box. 
5. Drill a couple of holes in the bottom for drainage.
Here a brace and bit being used to drill a couple of 3/8" holes.
6. Line the insides of the planter box with builders plastic or similar. Use a nail or screwdriver to poke holes in the plastic where the drainage holes are in the wood below. Your planter box is now ready for planting - unless you are going to paint it first!

One planter box, completed and ready to fill with soil.
7. Fill the planter box with nice soil, and plant out with seeds or seedlings.

Soil in and seedlings planted.
8. Place the planter box in a suitable location. Here in Perth, Western Australia, termites will enjoy the pine planter box. Placing on a concrete path, verandah or porch will help slow down the termites. Placing the planter box directly on the soil in the garden may prove too tempting for them! Don't for get to water regularly and apply some worm castings or chook poo to give the plants a boost.

A few weeks later, and the family can keep harvesting goodies from the planter box!
It's amazing how much food can be grown in a planter box like this. If you plant leafy vegetables, like lettuce, bok choy, silver beet, etc, you can continually harvest leaves as you need them from the plants, and they will keep producing for many weeks or even months.

Kids will love harvesting food from the plants they have planted in the planter boxes they have made themselves!

All you need is a few very basic tools and materials and a glazing box. Raid your local glazier now!

Sunday, February 19, 2012

Kids woodwork at the Perth CIty Farm holiday program.

It was a pleasure to be part of the Perth City Farm's Holiday Program in January. For a whole week a heap of kids aged 6 - 10 rotated between cooking, ceramics, woodworking, junk art, circus skills, and more. My task was to provide the woodworking opportunities, with a different project each day. Day 1, it was kitchen spatulas; Day 2, wooden whistles; Day 3, Cheese Boards; Day 4, Tool Boxes, and Day 5 it was Garden Benches for Perth City Farm.  All the material I provided had been salvaged from the waste stream. Recycled timber from packing creates, furniture industry waste, and the rubbish tip. All very consistent with the ethos of Perth City Farm. Each woodworking session commenced with some "free creative play" - benches with vices, hammers and nails, saws, and a big pile of pieces of wood. The kids always make an amazing array of stuff. Heaps of fun and a great chance to build some skills.
Some of the crew with their Cheese Boards and other creations. Day 3.
Kitchen Spatulas.
After warming up on some free creative play, we knuckled down to making spatulas. The kids could choose from a range of hardwood pieces about 350mm (14") long by 60mm wide (2 3/8 ") wide by 7mm (5/16") thick. This material was all waste from industry - including my own - and was all predominantly West Australian timbers. After a discussion about spatula design, laying out the design around grain direction and imperfections, I drew my shape and did a demo for the kids on how to cut out the shape. Coping saws for the curved cuts down past the transition points, then small panel/rip saws to do the long straight cuts. All done using vices to hold the work. I then demo'd how to use a spokeshave and rasp to clean up the edges, and the block plane to bevel the chisel point on the end. The kids got into it quickly.
Using a spokeshave to clean up the edges and the curve from the big end to the handle.
Using a small panel saw to rip down the sides of a straight handle.
A couple of spatula designs, like the kids made.
Cheese Boards.
The Cheese Boards started out as pieces of pine about 250mm (10") long by 140mm (5 1/2 ") wide by 16mm (5/8") thick being available to the kids. This timber all came from a packaging crate from Mexico. The ISPM 15 Mark  gave me this information, before I had earlier machined the material down to the sizes above. Each kid got to choose a piece from the pile of pre-cut pieces, after I explained a bit about the wood and the project ahead. I then did the demo on how to draw the shape and get started on the cutting.  Coping saws on the curves, followed by a spokeshave to clean up the edges. A great opportunity to learn about working with the grain direction! Block planes for removing arrises, brace and bit for drilling the hole, a bit of hand sanding to clean it up, and a coat of orange oil to bring it up like a million dollars.

Spokeshaving to clean up the curved edge. Nice technique!

Practising boring a hole in a piece of waste. Note the block behind, to avoid tear-out.

Example of a completed cheeseboard in use.
Tool Boxes. The tool boxes are also suitable for holding DVDs, CDs, toys, and other goodies. Versatile in use, but also great fun to make. I did a post about these last time. Most of these were made primarily from plywood or piece of pine. The ends provided as rectangles with the angled cut lines marked on them ready, and the kids did the diagonal cuts with tenon saws and cleaned up the edges with block planes. The bases were supplied ready cut to size, but the kids had to cut the sides to length and the handle to length again with tenon saws - as well as round over the handle for comfort before fitting, usually with a block plane or the spokeshave. The plywood was retrieved from the tip, and the pine was retrieved from the bins at a furniture factory. I had machined it all to size in preparation for the project.
Nail selection is an important skill to learn.

One of the few times we used glue - to help fix the sides onto the end and base edges.

Driving the nails part way into the sides makes for an easier assembly when holding things in place and nailing.

Using a block plane to round over the top edges of the box sides before assembly.

Using a spiral ratchet screwdriver to drive screws in to fix the handles in place.He has his foot inside the box to keep it stable. The kids loved using this tool!
Apologies for the lousy pictures... the iphone camera does not like low light conditions or movement - but at least they give a bit of an idea of what was going on!

The toolboxes the kids made were similar to this one..

The Garden Benches.
After 4 days of making things for themselves, the 5th day we were going to make something for Perth City Farm. They were keen on the idea of some portable bench seating, so that was the project for the day. Lots of kids contributed to these during the day, but in the afternoon I had the keenest woodworkers of the group on board to bring them to completion. They all did a fantastic job.
Some 60 x 40 jarrah was used for the legs, with each end being a cross-housing joint. I cut most of the housings for these - a tricky job for the kids, anyway. The kids drilled and fitted the three bolts in each leg end assembly. The 4 boards on top and the spreader underneath were all made from recycled jarrah floor boards. The kids used planes to remove all the tongues and grooves, then block planes to remove the arrisses. Dirty, hard work, they did a brilliant job and did it all.  They did 10 sticks in this way. Why jarrah? ...because it is such a durable material in the weather, it was available on hand in the racks at Perth City Farm, and those sticks were just begging to be given to a new life.   

Nice job, gang! They were very proud of their work.
Having made the benches, I gave the kids the opportunity to carve some text onto the seat tops. I don't normally use carving V-tool chisels with kids, but these kids were fantastic, competent, and very keen. I gave them a demo and a chance to have a practice, then gave them mallets and V-tools. After discussing what we'd write on the benches, I wrote the letters and the kids set to work.

Busy at it, carving the lettering on the benches.


Benches made by kids and embellished by kids too!

No finish applied to the benches yet. That is old paint and plaster spots on the floorboards, echoing their past usage.
It was a very successful holiday program, and the woodworking activities were a real hit with the
kids. It was also a great opportunity for me to test out some new ideas and tool use with kids through the week. Kids always like to make stuff with hammers and nails and tenon saws. It was great in addition to see how quickly and enthusiastically they also took to the spokeshaves, block planes, coping saws, brace and bits, and spiral ratchet screwdrivers.

Yes, I am looking forward to the next Holiday Program at Perth City Farm. 

Saturday, July 16, 2011

A nice little project - Small Toolbox.

Today I did a woodworking activity at a kids birthday party. It was a heap of fun, and the 14 kids present, after doing some free creative play with hammers and nails and lots of bits of wood, could then chose between a couple of different projects. One of these was a small open toolbox with a handle.

Not just a toolbox - it can also hold magazines, toys, and more.
I had previously pre-cut all the components, and we just helped the kids to nail together the components in the right sequence. There are only 6 components, plus a few screws and nails. We didn't use glue this time, as the kids were in their party clothes. We don't want PVA glue on any fairy dresses!

Above is a plan of the toolbox which may prove useful to you. Double click on the image to open it up.


A couple of toolboxes under construction.
 These kids were all aged 6 and 7, and this project was quite straightforward to them. It was all hammers and nails, wihch the kids were pretty good at. The handles were the trickiest part, as the handle is not positioned up against an edge - though it could be flush at the top. However it looks better set down from the top by about 10mm. The kids used a hand drill to drill the screw holes for the screws. 

When it's completed, why not give it a coat of paint?
 A whole bunch of toolboxes and other creations went home with the smiling kids from the party today.
It's a great project and it's worth doing it again.  Happy birthday Nina and Tobi!

Thursday, June 23, 2011

Drilling holes - not such a boring task for kids!

Kids love making holes in wood. Recently I was running woodworking activities with kids in a festival situation. It was an opportunity for free creative play. There was a mountain of wood pieces to choose from, plus 7 benches, 20 hammers, nails, and a couple of saws - all there for kids to use to make their own creations. I also keep on hand a couple of braces and bits and a couple of hand drills. Like the saws, the use of the drilling implements is supervised fairly closely. In the pile of wood, were lots of small bits of dowelling. Each of the braces had a bit in it which corresponded with the two main dowelling diameters. The hand drills are used mostly to help with tricky nailing operations, or when a loose fit is needed (eg. Propellors on the front of a plane). However, any hand drill left lying around is quickly grabbed by some small hands and put to use - just randomly drilling holes! They love it, but small drill bits are readily broken unless the kids get some guidance and coaching. Fortunately the brace bits are a lot more robust.

About the Brace and Bit.
A brace with a bit in it.  
The first we know of the carpenters brace is from the Middle Ages. They appear in a number of paintings and woodcuts from Europe in the 15th Century. I understand there was also one found on the wreck of the Mary Rose. So they have been around for a while - but have been mostly unchanged for the last 150 years.
A pair of different braces - the one of the right is bigger and heavier.
Braces come in different sizes - the diameter of the crank sweep, the weight of the chuck and the crank, the weight of the handles, etc. In the picture above, the one of the left is lighter duty so is easier for kids to use.
There are a wide variety of bits for braces, with many different types, profiles, and sizes of bits - at times reflecting claims of new developments in technology in their day.  With kids I try to use the shorter bits - as the whole combination of brace and bit can get very long!

Note that all brace bits have a tapered square on the end, which fits the chuck.
 Pictured above, just a few of the brace bits commonly found. From the top down:
Gimlet Bit (also has a variety of other names);
Centre Bit;
Improved Pattern Centre Bit;
Wood drill or Twist Bit;
Short Auger Bit;
Auger Bit (small diameter),
Auger Bit (larger diameter),
Auger bit (of a diffferent pattern)
There are also many other types, plus things like screwdriver bits, countersink bits, and more.

Which bits are best for kids to use?
Using the criteria of ease of use and robustness, I would suggest the Centre Bits are the best for most applications when kids are using a brace and bit for drilling larger holes. The Improved Centre Bit takes the cake as it has a threaded centre point, which also helps to pull the bit through the timber under rotation. This is especially helpful if the kids are drilling into hardwood. They are short in length and pretty tough, but like all tools do not like to be dropped on their tips or points! The short auger bits are also really good for kids, and are better at staying straight doing deeper holes. They also have threaded centre points, which help.
I don't use gimlet bits, as they bend too easily. Length is a problem with standard auger bits, getting unwieldy for kids - hence my preference for the shorter versions.  The Wood Drill/Twist Bits are also pretty good, but not as commonly found in the flea markets and garage sales I frequent. Especially good in that size range between 1/4" and 3/8" - between the hand drill (max 1/4") and the centre bit (getting more fragile below 3/8").

Helping kids to use the brace and bit effectively.
Due to the overall length of the brace and bit, I usually get kids to use the tool in the horizontal position, rather than the vertical position. This makes it much easier for them to use. For example, they can lean into it and use their body weight to apply pressure. With their hands low in front of them, it is easier to rotate the crank. It works beautifully.
Horizontal use of a brace and bit, with work held in a vice. Cutting beautifully.

High vertical use of a brace - much harder to push and to hold the tool steady. Much more difficult.

Low vertical use of the brace. Workable because he can push down and keep the tool steady with his body.

Low horizontal use of the brace. Work held by a cramp and the tool steady and working well. 
The secret to kids successfully using a brace and bit is to hold the brace steady and apply enough pressure to keep the bit biting into the wood. The use of the body to both hold the tool steady and at the same time provide the required pressure is the best way of achieving this. Hence I have found that horizontal boring is the best way to do this. Of course this is usually made easier with the use of a vice and a sturdy bench.

About the hand drill.
The other main drilling option is the classic "eggbeater" style hand drill. These are good for smaller drill bits, up to 1/4 inch in diameter. These are lighter to hold than a brace, but also need to be used in a similar way to a brace - the top handle must be held steady and pressure applied to this top handle simultaneously.

Two hand drills - top one with 1/4 inch bit, bottom with 1/16 inch bit. 
 The problem with twist drills (the standard bits used in these hand drills) is that the smaller they are the more easily they break. With kids learning to use a hand drill, this can happen a lot! The trick is teaching them to keep the drill steady while winding the handle, and particularly to withdraw the bit without bending it. Keep winding forwards while withdrawing the bit in the direction of the hole - straight out. The smaller the bit, the more bits you will go through as they learn how to use the drill.

What to look for when buying hand drills.
If you want your tool budget money to go further, I reckon it is always best to buy second hand. Two reasons for this - they are much cheaper than good new ones, and the older tools tend to be much better quality than the cheap modern mass produced stuff. However, it helps to know what to look for. Some old tools are just plain worn out!

There's a few things to look for with hand drills:
1. The large gear drives either one smaller cog or two - which is best?
The single small cog models are prone to slipping. This can be very annoying at best and quite useless at worst. It is better to get the models with two smaller cogs. These do not slip and are generally much better quality.
Two differences: one has two smaller cogs (right), the other has one smaller cog (left). 
 2. Ensure the chuck is intact.
The chuck has three jaws, each held equally apart by the small springs which separate them in the base. Looking at the chuck partly opened, equal spacing will suggest all three springs are intact. If one is missing, there will be a much smaller gap between two of the jaws.

Nice even spacing of the three jaws - suggesting all three springs are there. That's important.
3. Ensure the shaft holding the chuck is not bent.
Give it a few revolutions with the handle, watching the chuck. If it wobbles around in a circular motion, it is only good for a few parts. If it sits there turning around straight and true, then it is a winner.

The life time and life skill legacies. 
 The hand drill on the right in the picture above (comparing two drills) is the drill that I was given when I was a child, about 10 years old. Before that I used one of my father's. That hand drill is still going strong. I expect to pass it on to one of my grand kids some day.

The knowledge and ability to drill holes is one of those life skills which make up the tools for sustainable living. If you can fix stuff which is broken, make stuff and modify things around us, build and connect stuff together, then you are empowered with a resourcefulness and ability to reduce your footprint on the planet. The ability to use the body's energy rather than fossil fuel powered electric tools is both very healthy and kinder for both the spirit and the planet. It also builds a greater appreciation for that wonderful organic renewable recyclable low-energy versatile material we call wood.

I was doing woodworking with a class of 24 pre-primary children recently. A boy was trying to work out how to attach a piece of dowelling to his wooden creation. Experience told me we would be unable to nail it on without the hardwood dowel splitting in two. I suggested we should drill a hole in it first, to accept the nail. He response was: "Wow, that will be noisy!" Expecting me to produce an electric drill, I brought out the hand drill. He had never seen one before, and was amazed when we drilled the hole with the hand drill. After that, he wanted to drill holes in everything!

When kids are using a brace and bit with me, parents are often heard to say: "My grandad used to have one of those in his shed! ... Is that how it works?!"

Revelation can come through life's simple pleasures.

Thursday, February 24, 2011

Kids can readily use saws to cut wood to length.

When kids are making their creations, they will commonly want a piece of wood to be cut shorter or to a particular length. This is a great time to teach them how to use a saw properly. It is amazing how quickly kids can learn to use a saw, so long as we provide a saw which they can handle comfortably and a few pointers to help them develop good and easy technique. Sawing technique is one of those wonderful life skills which, once mastered, can prove very handy throughout our lives.

In this post I'd like to offer a few suggestions about which type of saws will be best for kids to use. There are basically two different types of sawing we undertake in woodwork:
Ripping is cutting wood "with the grain", that is, in the same direction that the grain runs - usually this is along the length of the piece of wood, to cut the piece of wood to width.
Cross-cutting is cutting wood across the grain as the name suggests. It usually means cutting the piece of wood across its width - which mostly means cutting a piece of wood to length.

Traditionally, the teeth for ripping and crosscutting are shaped differently. Ripping teeth are more like little chisels and cross cutting teeth are more like little knives in the way that they cut. However we will not get too caught up in the technical stuff around this here!

At this point, we are only considering the cross-cutting of wood. The saws used for this purpose we will discuss here are those belonging to the family known generally as Backsaws.

The family of Backsaws.
Traditional saws of European origin (Western style saws), are mostly designed to cut on the push stroke. While there are Japanese style saws available on the market, which cut on the pull stroke, I do not normally use them for teaching kids or adults. To help build consistent sawing technique, I provide and use a range of backsaws with the adults and kids I am teaching. Backsaws have a stiffening piece of metal added to the top (back) edge of the saw blade to keep it stiff as it is pushed through the wood. Generally speaking with the older saws, British made saws tended to have brass backs and US made saws tended to have steel backs.

The saws from the Backsaw family we would mostly use with kids will be the Tenon Saw, the Dovetail Saw, and maybe the Gent's Saw.
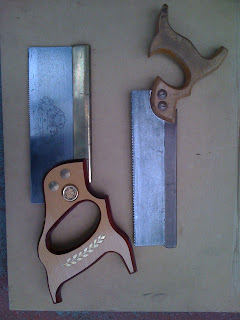
The saw on the left in the picture is a traditional Dovetail Saw. While they often have open handles, the blades are small and short (around 8 inches) with fine teeth.  Light and well balanced, these are perfect for kids to use. However if the timber to be cut is too thick, the back of the saw will prevent cutting all the way through. Moments like these you may need a deeper Tenon Saw.

The saw on the right is a Tenon Saw. It is a real oldie, one of those wonderful finds from a garage sale. A Disston, as I recall the medallion on the handle dates it at being made between 1897 and 1913. Still going strong. While the blade is a bit pitted with surface corrosion, it still sharpenned OK.

Even though both of these saws pictured are over 100 years old, I use them both with kids all the time. Such lovely saws and so easy for kids to use.

The saw pictured on the left here is a Tenon Saw. It is a modern one, a Pax, made in Sheffield, UK. A beaut saw, it is deep in the blade, but very short for a tenon saw - 8 inches. The main problem with it is the huge handle, which is so out of proportion to the blade. Not very kid friendly because of this.

The saw pictured on the right is another Dovetail Saw. The main problem with this one is the steel back on the blade is very thin. It has been bent a couple of times by enthusiastic kids who were still getting the hang of the required piston-action in the arm.

Both of these are nice saws, but neither is ideal for kids to learn with I would suggest.


The saw on the left of this picture is another Tenon Saw. It is a special one for me, the one I use every day. Over 100 years old, it belonged to my great grandfather, who was a coachbuilder and wheelwright. Another quality old Disston, it has a steel back, a nice long blade, but not too deep in the blade. Beautiful to use.

The saw on the right is known as a Gent's Saw. Note the handle is a very different profile. I don't find that the handle shape and the way the hand grips it is always helpful, but for some kids it works well. The advantage with these is the teeth are usually super fine and they are very light. Soe fome applications, like small sections of wood and thin dowelling, these are the ideal cross-cutting tool.The disadvantage is that the thin blades and thin backs get bent really easily! This one has a small kink in it from one of my grandkids using it.

Note that these two saws are sitting on a bench hook. A bench hook is the crucial companion for cross-cutting with these saws. The bench hook is a simple thing to make, and a great aid for all saw users, not just for kids!

This little guy in the picture is sawing like a champion. I always teach the pointing forward of the index finger, as ergonomically it aids a good piston action with the arm. He is using a bench hook, and you may just be able to see the small cramp which is helping hold the piece of wood in place. His feet are the wrong way around for a right hander. It would be better if he had his left foot forward, but he is doing OK.

When learning to saw, trying to hold the piece of wood in place is one less distraction from getting the sawing action right. The kids quickly get the hang of using the cramp, and as their sawing action improves, they will soon no longer need to use it.

While the index finger pointing forward technique what I teach, I don't get too anal about it. I just gently remind them that it will help a lot if they use it. They get there eventually. It is always more important that kids are encouraged to have a go rather than us hassling them to develop good technique immediately.

While not holding the saw with the index finger pointing forward, this guy was still confidently sawing small comonents for his project, using a dovetail saw. You can see how nicely the saw sits in his hand. He is using the benchhook to steady the work, without using a cramp to help.The bench hook was cramped onto a pair of small low saw stools, about 22 inches (550mm) high. A good height for him.

On this project we were making wooden whistles based in their construction on wooden organ pipes. A number of small components are required to be cut to size, with some accuracy required in the measuring, marking and cutting - which the kids did brilliantly. The dovetail saw is just perfect for this type of task, cutting small pieces accurately.

Want to find a plan for a bench hook? There are plenty out there. Just put "Bench Hook" in your search engine and off you go...

Obtaining these saws.
The resurgence of interest in hand skills and hand tools has seen many boutique sawmakers coming onto the market with their wares. There are some very beautiful new saws out there, but they mostly cost serious money. Unless you are oozing with spare cash, you may like to look for nice tools through garage sales, markets and tool collector sales. Most of the saws pictured above I have obtained from these sources. Remember that most second hand saws will be very blunt, and will need to be sharpenned. Get a saw doctor to sharpen them for you unless you are proficient at doing it yourself. If I find a second hand dovetail saw for $10 to $30, and spend $15 getting it sharpenned, it is still a cheap saw. I can pick up second hand tenon saws for as little as $2 sometimes, some of which are over 100 years old. Garage sales are good for bargains!

Happy hunting, and enjoy helping kids get the hang of sawing!